Part 4. Higher plans
17 Delivery protection in the checkout
An opt-in protection line in the checkout, priced by you, with its cost shown before the buyer ticks. Shopify Plus only.
This chapter needs Shopify Plus. Checkout extensions do not render on other Shopify plans, whatever app you install. That limit belongs to Shopify. We keep these features in their own plan, Scale Plus, so that nobody pays for a screen they will never see.
A checkbox in the checkout that adds a fixed-price line: cover against loss, damage or theft in transit. The buyer ticks it, the line joins the cart, and they pay for it with everything else. It is a store policy, not a campaign: same offer, same price, every order. The other checkout blocks have their own chapter, the next one.
Place the block first
Shopify only shows it where you put it. Open your checkout editor and add the Delivery protection block wherever you want the checkbox. Without that step, nothing you set up in the app is ever shown.
Apple Pay, Google Pay and Meta Pay skip the checkout page entirely, so those buyers never see the checkbox. iDEAL does work here, unlike on the one-click page.
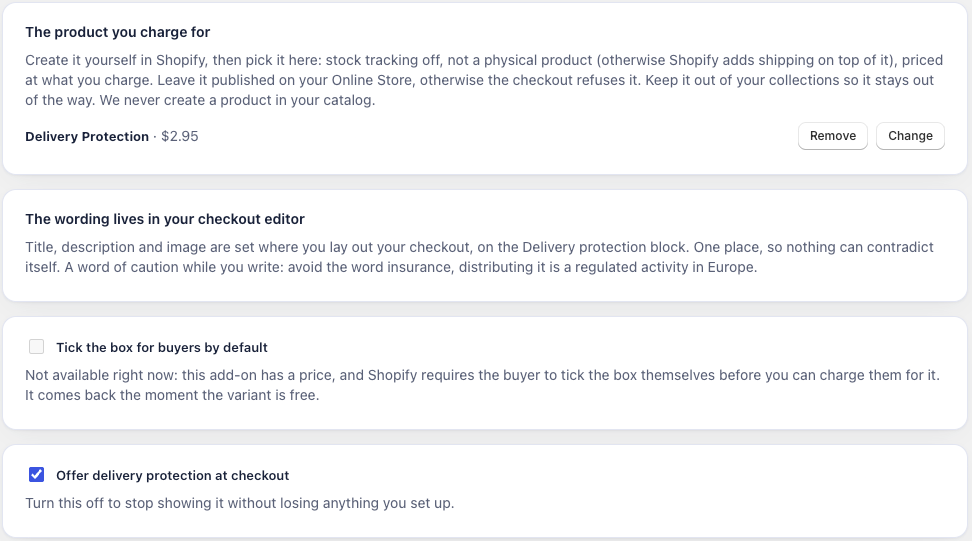
The product you charge for
You create the product yourself in Shopify, then pick it on the app’s Checkout page. You decide what it costs and what it covers. The app never creates a product in your catalogue.
- Keep it published to your online store. Unpublished, the checkout answers “Unavailable product” and drops the line on every order. Keeping it out of your collections is what keeps it out of sight, not unpublishing it.
- Make it a non-physical product, with stock tracking off. A physical protection product can attract a shipping charge of its own.
- Keep it active. A draft or archived product cannot be added to an order.
The app reads the product’s real state and warns you on the Checkout page if any of these is wrong, rather than letting you find out at checkout.
Wording, image and colour
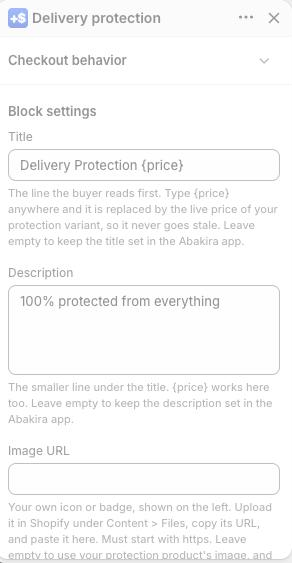
The text and the image are edited in the checkout editor, on the block itself, so you can see what you are changing while you change it.
- Title and description. Write
{price}anywhere in them and it is replaced by the live price of your protection variant, so it cannot go stale when you change the price. Avoid the word insurance: distributing insurance is a regulated activity in Europe. - Image. Upload it in Shopify under Content, then Files, copy its URL and paste it into the image field. Checkout blocks have no file picker, which is why it takes two steps. If you leave it empty, the product’s own image is used, then a fallback icon. The checkout has no shield icon, so upload one as an image if you want a shield.
- Colour. The tick colour is not one of our settings, and it cannot be. Checkout blocks inherit your checkout branding, so you set it in Settings, Checkout, Customize, then Accent and buttons. Shopify labels that colour “links, selections and buttons”, and selections means the ticked box. Change it there and it matches every other control in your checkout, not just ours.
The price is always shown before the tick
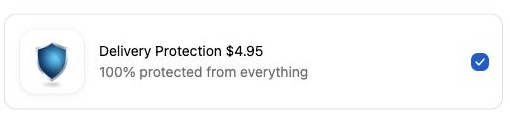
When the protection costs something, its amount is shown in bold under the checkbox, so the buyer knows the cost before adding it. When it is free, the box stands alone.
Pre-ticking is for free protection only
Shopify requires the buyer to tick a paid add-on themselves before you can charge them for it. So the app lets you pre-tick the box only when the protection product is free. On a paid product the setting is unavailable, and the app says why. It checks the real price in Shopify when you save, and again whenever the product changes, so raising the price later switches pre-ticking off on its own.
If the app cannot read the product’s price, it does not assume it is free: the setting stays unavailable until the product is readable again.
In the European Union, a pre-ticked box that adds a charge is not enforceable either, under article 22 of the Consumer Rights Directive. The free case is the only one where pre-ticking is both allowed and safe.
Running it as a test
The block can be limited to one group of buyers, using a cart attribute written by an A/B testing tool. Set the attribute name and the value to match in the block settings, and only that group sees it. The control group gets an untouched checkout, and nothing is ever added to their cart. That last part matters, because a control group quietly buying protection would poison the comparison you are running.
Leave those two fields empty unless you run such a tool. Anything typed there hides the block from every buyer whose cart does not carry that attribute, and only your A/B tool can write it. A stray value means nobody sees the protection.
Last updated