Checkout upsell on Shopify: in the checkout or right after
A Shopify checkout upsell lives in the checkout on Plus, or one tap after payment on every plan. How each reaches buyers, and which to build first.
2026-11-02 — Abakira, updated 2026-11-08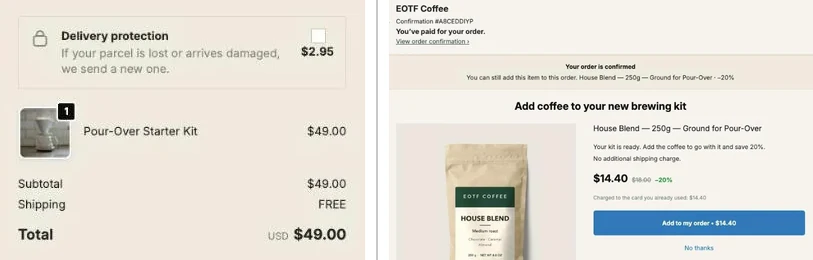
A checkout upsell on Shopify is an extra product offered while the buyer pays, or one tap after. Inside the checkout itself, Shopify shows app offers only on Shopify Plus stores. On every other plan, the same offer works right after payment, on the one-click page: the item joins the order just paid, charged to the same card.
So the real question isn’t “can I upsell at checkout” but where your buyers can see the offer, and what belongs on each side of the Pay now button. Our answer, built into Post Purchase Upsell Abakira: one small add-on inside the checkout if you’re on Plus, everything else after payment. On our demo coffee store, a $49.00 pour-over kit became a $63.40 order with one tap after payment, on order #1010, one order and one parcel.
What counts as a checkout upsell on Shopify?
A checkout upsell on Shopify is any offer shown between the moment the buyer clicks Checkout and the moment they see their confirmation. It sits in one of two places: inside the checkout page, before payment, or on the pages Shopify shows right after payment. Both add to the same order. They differ by plan, reach and risk.
People use “checkout upsell” for both, and the advice online mixes them up. Here’s how they compare on Shopify, as of November 2026:
| Inside the checkout | One-click page, right after payment | Thank-you page | |
|---|---|---|---|
| When | Before the buyer pays | Between payment and confirmation | On the confirmation |
| Shopify plan | Shopify Plus | Basic and up | Basic and up |
| How the item is paid | In the same payment as the cart | One tap, charged to the card already used | Added to the order, the buyer pays the difference |
| Risk to the main sale | Some: it sits where buyers abandon | None: the order is paid | None |
| Countdown timer | Not allowed | Allowed | Yes |
| Where you set it up | Checkout editor, Add block | Settings > Checkout > Post-purchase page | Checkout editor, Thank you page |
A single-tick add-on inside the checkout is often called an order bump. Our article on order bumps in the checkout and after payment covers the checkbox format in detail; this page is about choosing between the two sides of payment and making them work together.
Do I need Shopify Plus to upsell inside the checkout?
Yes. Shopify’s help center states that apps customizing the information, shipping and payment pages of the checkout are available only to Shopify Plus. Apps on the thank-you and order status pages are available from the Basic plan up, and the one-click post-purchase page works without Plus too.
“Plus” covers more stores than the plan flag suggests. A store on the Plus trial renders checkout extensions, even though Shopify’s shopifyPlus field answers false for it. Post Purchase Upsell Abakira reads the plan name as well, and treats four cases as able to show checkout blocks: Shopify Plus, Plus Trial, Plus Partner Sandbox, and development stores. Development stores matter because that’s where you, or an agency, build and test before going live.
When the app can’t confirm your store will render these blocks, its Checkout page says so instead of letting you build something nobody will see. The headings you can meet there:
- “Your store is not on Shopify Plus” when Shopify reports a plan that won’t render the blocks.
- “Your checkout refuses added lines” when a real checkout of your store reported that adding a line is off.
- “We could not read your store plan” when the read failed. That’s an unknown, and the app says so rather than calling it a no.
On the app side, checkout blocks are part of the Scale Plus plan. The app keeps them in their own plan so a store that can’t render checkout extensions never pays for them. The guide chapter on choosing a plan lists what each plan includes.
Which buyers see an offer inside the checkout, and which see one after?
An offer inside the checkout reaches buyers who fill in the checkout page, whatever they then pay with, including bank redirects like iDEAL. An offer on the one-click page reaches buyers who paid by credit card. The thank-you page reaches every buyer who completes checkout. Each place misses a different group, so each catches someone the others don’t.
That’s the overlooked part of the choice. Our admin puts the checkout side this way: “Apple Pay, Google Pay and Meta Pay skip the checkout page entirely, so those buyers never see the checkbox. iDEAL does work here, unlike on the post-purchase page.”
| How the buyer pays | Sees a checkout block | Sees the one-click page | Sees the thank-you page |
|---|---|---|---|
| Card, typed in the checkout | Yes | Yes, when Shopify allows it | Yes |
| iDEAL, Bancontact and other bank redirects | Yes | No | Yes |
| Cash on delivery chosen in the checkout | Yes (the block renders on the checkout page itself, before any payment method is chosen) | No | Yes |
| Apple Pay, Google Pay, Meta Pay express buttons | No, they skip the checkout page | No | Yes |
Shopify also skips the one-click page when an order has duties, is paid in more than one currency, is for local delivery, or comes from a sales channel other than the online store. Our article on why Apple Pay, PayPal and Google Pay orders skip the post-purchase page goes through each case.
Two things follow. A Plus store with lots of iDEAL or cash on delivery orders gets real reach from a checkout block, because those buyers never see a one-click page. And the thank-you page is the only place every buyer passes through, which is why it belongs in every setup.
How do I choose between inside the checkout and right after?
Choose by two facts about your store: whether it can render checkout blocks, and how your buyers pay. Without Plus, build the one-click page and the thank-you page. With Plus, add one small offer inside the checkout and keep everything else after payment. The checkout offer is a bonus on top, never a replacement for the pages after payment.
| Your store | What to build, in this order |
|---|---|
| Not on Plus, half or more of orders paid by card | One-click page, then thank-you page, then order status page |
| Not on Plus, under half of orders paid by card | Thank-you page and order status page, then one-click page |
| On Plus, mostly card orders | One-click page, then one add-on in the checkout, then thank-you page |
| On Plus, many iDEAL, COD or other non-card orders | Thank-you page, then one add-on in the checkout, then one-click page |
The 50% line is the one our app uses when it lays out a setup order for a store. The method for counting your payment mix in ten minutes, and the full build order after checkout, are in our article on which page to build first after checkout.
Why keep the checkout to a bonus? Because an offer after payment can’t cost you the order. The buyer has already paid. An offer inside the checkout sits on the page where buyers decide whether to finish, so every extra choice there has a price the after-payment pages don’t charge.
How many upsells should one Shopify checkout show?
One. Fewer choices at the moment of paying is the technique: one recommended add-on in the checkout, and every other offer after payment. Our article on order bump on Shopify explains why a single offer before payment beats a list.
The lists that recommend “ten checkout upsells” count on reach. The one-offer rule counts on attention. A buyer filling in an address reads one card, maybe. Six cards turn the payment page into a catalog.
Post Purchase Upsell Abakira lets a funnel hold up to six blocks per surface, and there are reasons to use more than one in the checkout: a free shipping bar above the card, or a stock check that confirms the cart. But keep the product offers to one block. If you want to test which product works best there, test versions of that one block rather than stacking two.
There’s a pricing reason too. In a Shopify checkout, a product carries a single discount rate. If two blocks discount the same product, the first block wins, and our editor flags the second one: “Another block above already sets a discount on one of these products. In the checkout a product carries a single rate, and the first block wins — so this one’s rate is not applied to it.”
What should go inside the checkout, and what should wait until after payment?
Inside the checkout, offer something small and obvious that rides along with the cart: a refill, a filter pack, delivery protection, a second unit. After payment, offer what needs a real decision: a bigger product, a bundle, a subscription, a second offer when the first is declined. The test is whether the buyer can say yes without stopping.
On our coffee demo store, prices make the split easy to see:
| Offer | Price | Where it goes | Why |
|---|---|---|---|
| Delivery protection | $2.95 | Inside the checkout, as a checkbox | A fixed-price line that needs no thought |
| Paper Filters 100 Pack | $8.00 | Inside the checkout, one product block | Cheap, needed with a pour-over kit, under a fifth of a $49 cart |
| House Blend 250g, 20% off | $14.40 instead of $18.00 | One-click page | A real product at a visible discount, accepted in one tap |
| House Blend, filters and mug bundle | $42.00 at list price, with a bundle discount you choose | Thank-you page | Three items, a bigger decision, seen by every buyer |
Two rules from that table. Keep the checkout add-on well under the cart value: on a $49 kit, an $8 filter pack, not a second kit. And save the offers with several items or several choices for after payment, where the buyer has time and nothing to lose. The weekly price test for the protection line is in how to price shipping protection on Shopify.
The full list of offer ideas, by store type, is in the guide chapter on what to offer.
How do I add an upsell inside a Shopify Plus checkout?
Adding an upsell inside a Shopify Plus checkout takes two places. In Post Purchase Upsell Abakira, you build the offer in the funnel’s In the checkout tab. In Shopify’s checkout editor, you place the Checkout boost block that displays it. Skip the second step and nothing appears, with no error anywhere.
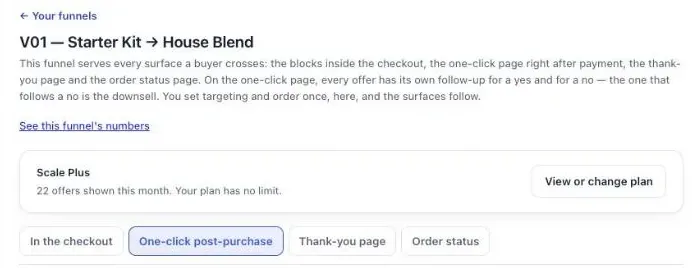
- In the app, open a funnel and click In the checkout.
- Click Add a block. Checkout blocks come in Text, Banner, Single product, Carousel and Bundle. For the one add-on, pick Single product, choose the product and set its discount.
- Click Save. Changes reach the checkout when you save them.
- In Shopify admin, go to Settings > Checkout. In the Configurations section, click Edit next to your checkout.
- In the section where you want the offer, click Add block and choose Checkout boost. Click Save.
- Open your store, add a product that matches the funnel, go to checkout and click Add on the card.
The app’s checkout tab spells out step 5: “Shopify only shows this where you put it: open your checkout editor and add the “Checkout boost” block. One time, two minutes. Without that step, nothing you set up here is ever shown.”
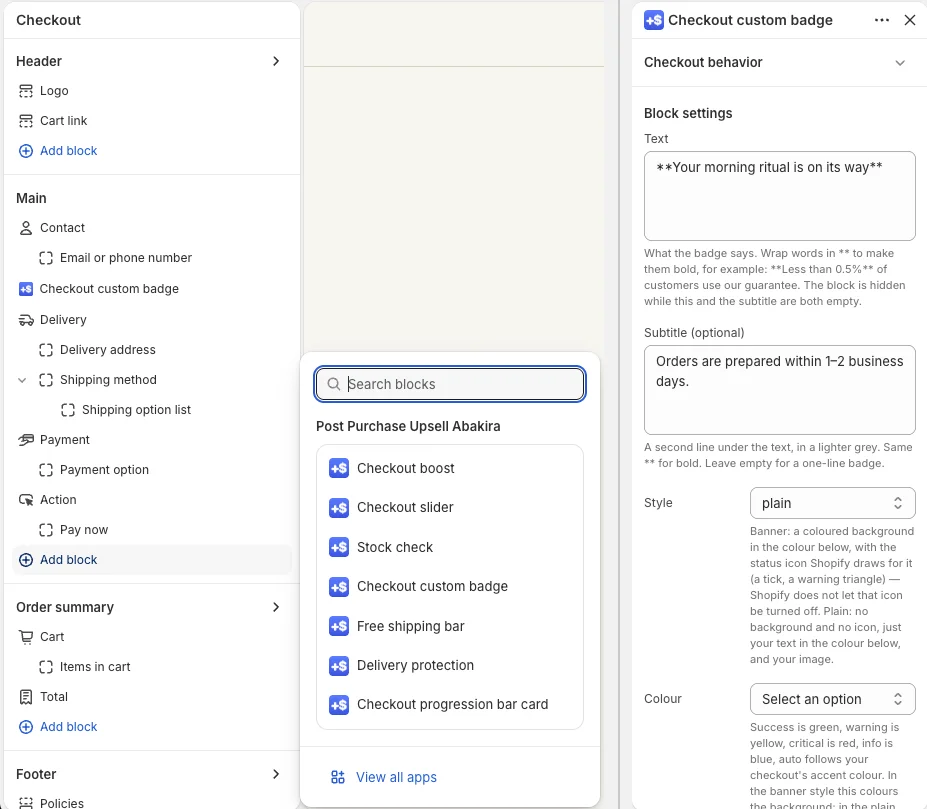
Placement in the editor is not a detail we could skip in the app. We measured it on August 21, 2026: on all three surfaces, only blocks a merchant places with Add block render. Fixed positions that an extension declares on its own never ran. So the editor step is how every checkout block gets on the page, ours included.
The buyer sees a card under the heading you write, or “Add to your order” in their own language if you leave it blank. When the buyer clicks Add, the line joins the order summary and the button turns into Remove. The card can also show a quantity picker when you set quantity tiers on the block.
Where in the checkout should the upsell block go?
Put the product block where the buyer looks just before paying: the order summary, near the total, or above the payment section. Shopify offers no app spot directly under the Pay now button. On a phone, though, the order summary moves below the button, so the last block of the order summary ends up under it.
On a computer, that same block stays in the right-hand column next to the form. If “right under the button” matters to you, put the block at the end of the order summary and check both screen sizes in the editor preview.
Other blocks work better higher up. A short reassurance line between the contact and delivery steps sets the tone before the buyer types an address. On our demo store, a Checkout custom badge in the plain style reads “Your morning ritual is on its way” with “Orders are prepared within 1–2 business days.” beneath it:
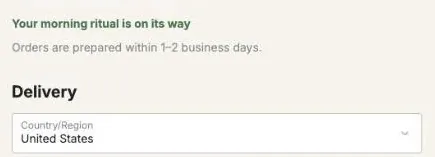
The same block can be placed twice in the editor; each copy then has its own settings. That’s handy for a badge, rarely for a product offer, for the reasons in the section on how many upsells to show.
What does the app check before it shows an offer in the checkout?
Before Post Purchase Upsell Abakira shows an offer inside the checkout, it reads Shopify’s answer to one question: can an app add a line to this checkout right now? Shopify exposes it as canAddCartLine. If the answer isn’t yes, the card stays hidden, so no buyer ever clicks a button that was going to fail.
Shopify’s developer documentation names draft order checkouts and accelerated checkouts among the cases where adding a line is refused. A few more checks run on our side:
- One funnel per buyer. A buyer sees the checkout blocks of the funnel their cart matches, by the same conditions and in the same order as your funnel list. Several funnels and cart conditions are on the paid plans.
- No “Show it to” rules. The buyer hasn’t paid yet, so rules like “accepted an offer” can’t be true in the checkout. They exist on the thank-you page.
- A live price. The price on the card is read from your store when the checkout loads, and Shopify applies the discount through a discount function, so the price shown is the price paid.
- Stock. A product Shopify reports as unavailable shows a grey “Unavailable” button. If Shopify refuses the line anyway, the buyer reads “This could not be added. Nothing in your order has changed.”
The guide chapter on checkout blocks covers the other blocks: stock check, free shipping bar, slider and progression bar card.
How do I upsell right after checkout on any Shopify plan?
To upsell right after checkout on any Shopify plan, turn on the one-click post-purchase page and add a thank-you page block. The one-click page charges the card already used in one tap. The thank-you page catches the buyers the one-click page skips. Neither needs Shopify Plus, and both add to the order just placed.
- In Shopify admin, go to Settings > Checkout. In the Post-purchase page section, select Post Purchase Upsell Abakira and click Save. Shopify allows one app there at a time.
- In the app, open a funnel, click One-click post-purchase and add the first offer.
- In the checkout editor, select the Thank you page, click Add block, choose Thank you page offer and click Save.
- Build the thank-you block in the funnel’s Thank-you page tab.
The guide chapter on turning on the one-click page shows the Shopify screen for step 1.
On the one-click page, the buyer reads the amount three times before tapping: the price, the line “Charged to the card you already used: $14.40”, and the button “Add to my order • $14.40”. A tap on “No thanks” sends them to the confirmation without touching the order. Our step-by-step on how a one click upsell works on Shopify covers the setup and what happens between the tap and the order.
The accepted item joins the order already placed. This is the thank-you page of order #1010 after the one-tap yes:
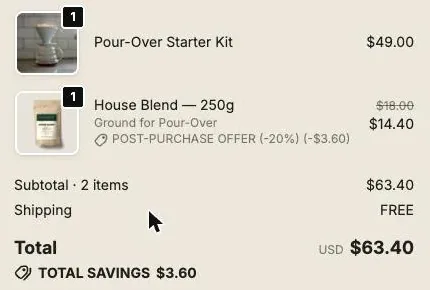
The free plan of Post Purchase Upsell Abakira runs this on a live store: one funnel, one offer level on the one-click page, up to 100 offers shown a month. Second and third offers after a yes or a no are on the paid plans.
Can I run a checkout upsell and a post-purchase upsell together?
Yes, and in Post Purchase Upsell Abakira they live in the same funnel. The In the checkout, One-click post-purchase, Thank-you page and Order status tabs share one set of conditions and one place in your funnel list, so you set the targeting once and the buyer moves through all four surfaces of the same funnel.
A sequence for a Plus store selling pour-over kits:
- In the checkout: Paper Filters 100 Pack at a small discount, one product block, nothing else.
- One-click page, card buyers: House Blend at 20% off, $14.40 instead of $18.00.
- Thank-you page, buyers who didn’t see the one-click page: the same House Blend offer, so iDEAL, cash on delivery and express-wallet buyers get what card buyers got. That rule is on the Pro plan and above.
- Order status page: a care tip and the refill they’ll need next month.
Don’t repeat the checkout product after payment. A buyer who skipped the filters a minute ago has answered. Use the one-click page for the next product up, and let the thank-you page catch the buyers who paid another way. The thank-you page chapter of our guide shows its five “Show it to” rules.
How do I compare a checkout upsell with a post-purchase upsell?
Compare a checkout upsell with a post-purchase upsell by revenue per surface, read on the buyers each surface can reach. In Post Purchase Upsell Abakira, the Results screen splits extra revenue by surface and shows acceptance on the one-click page. The checkout side is read on what sold, through the By product table.
The admin states the limit of the checkout figures plainly: “Checkout doesn’t count views, and a checkout line doesn’t say which block sold it: a product from a checkout bundle shows under the product.” That’s why the one-block rule helps measurement too. With one product offer in the checkout, every sale of that product inside the checkout belongs to it.
Three readings worth doing once a month:
- Checkout revenue against the share of orders that went through the checkout page. Express-wallet orders never saw the block, so don’t count them.
- One-click acceptance against the card share. If 40% of orders are card payments, judge the offer on those 40 buyers in 100.
- The thank-you tile against the non-card share. On a store heavy in iDEAL or cash on delivery, that tile is where most of the money after payment comes from.
For where these sit among the other ways to raise basket size, see what actually raises average order value on Shopify, and our methods page for the rest of the techniques.
Post Purchase Upsell Abakira runs the checkout blocks, the one-click page, the thank-you page and the order status page from one funnel. The free plan shows up to 100 offers a month; the listing has the current plans.
Set up a checkout upsell and a post-purchase upsell on Shopify
- Select the app for the post-purchase page In Shopify admin, go to Settings > Checkout and, in the Post-purchase page section, select Post Purchase Upsell Abakira. Click Save.
- Build the one-click offer In the app, open a funnel, click the One-click post-purchase tab and add the first offer: a product the buyer will want with what they just bought, at a visible discount.
- Add one product block in the checkout tab On a Shopify Plus store with the Scale Plus plan, click the In the checkout tab of the same funnel, add a Single product block with a small add-on and its discount, then click Save.
- Place the Checkout boost block In Shopify admin, go to Settings > Checkout, click Edit next to your checkout configuration, click Add block in the section where you want the offer, choose Checkout boost and click Save.
- Place the thank-you page block In the same editor, select the Thank you page, click Add block, choose Thank you page offer and click Save, so buyers who skip the one-click page still see an offer.
- Test with two orders Place one test order paid by card and one paid another way. Check that the checkout card adds and removes its line, that the card buyer reaches the one-click page, and that the other buyer lands on the thank-you block.
Frequently asked questions
Does a Shopify Plus trial store show checkout upsells?
Yes. A store on the Plus trial renders checkout extensions even though Shopify's plan flag reports it as not on Plus. Post Purchase Upsell Abakira reads the plan name as well as the flag, so a trial store, a Plus partner sandbox and a development store are all treated as able to show checkout blocks.
Can I put an upsell directly under the Pay now button?
There is no app spot directly under the Pay now button. On a phone, the order summary moves below the button, so the last block of the order summary sits under it. On a computer, that block sits in the right-hand column. Place the block at the end of the order summary and check both screen sizes.
Where can I put a countdown timer on a Shopify upsell?
On the one-click page after payment, where the offer really ends when the timer reaches zero. Shopify's App Store rules keep countdown timers out of the checkout itself, so the timer goes on the page after payment.
Does an item added inside the checkout create a second order?
No. The item becomes a line in the cart before payment, so it is paid in the same payment and ships on the same order. Items accepted on the one-click page after payment also join the order already paid, without a second checkout.
Can a checkout upsell be sold as a subscription?
Yes. In Post Purchase Upsell Abakira, a product offered in the checkout can carry a selling plan, and it goes into the cart with that plan. The card shows the plan name and the note: This is a subscription. It renews automatically until you cancel it.
Related articles
Written by Abakira. We make small software: Shopify apps, web tools and iPhone apps. This article is about Post Purchase Upsell Abakira.