Shopify post-purchase extension: what you can control
The Shopify post-purchase extension draws the page between payment and thank-you from fixed parts. What it shows, which rules bind it, and what you can change.
2026-11-03 — Abakira, updated 2026-11-08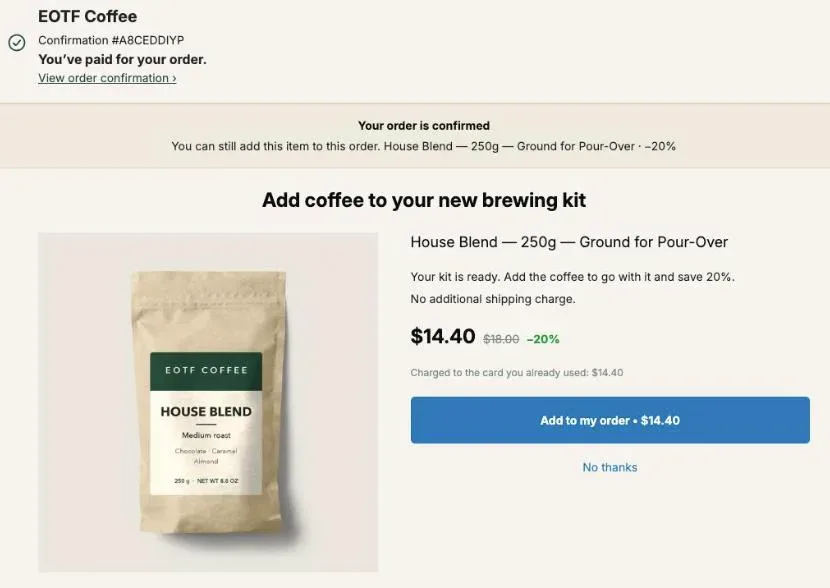
The Shopify post-purchase extension is the piece of an app that draws the page between payment and the thank-you page. Shopify hosts it, runs it only for eligible orders, and renders it from a fixed set of its own components, so no theme code or CSS reaches it. As a merchant you pick which app runs it, then you control the offer, the images and most of the words, never the layout rules Shopify enforces.
This page looks at the extension itself, from the merchant’s side: what it can put on screen, which parts Shopify locks, what the App Store rules require, and what happens when two of your apps both ship one. Everything shown comes from our coffee demo store and from Post Purchase Upsell Abakira’s code as of November 3, 2026.
What is a Shopify post-purchase extension?
A Shopify post-purchase extension is a small program inside an app that Shopify loads after the buyer pays and before the thank-you page. It decides whether to show a page for this order, then fills that page with an offer the buyer can add to the order they just paid, on the same card, without typing anything again.
Under the hood it has two moments, and both shape what you see as a merchant:
- The check, during checkout. While the buyer is still on the payment step, the extension asks the app’s server what to show. Shopify’s guidelines ask for this call to finish within two seconds. If the server has no offer for this order, or doesn’t answer in time, the buyer goes straight to the thank-you page and never knows anything was considered.
- The page, after payment. If the check said yes, Shopify draws the page. The buyer taps to accept or decline, and the extension hands control back to Shopify, which moves on to the order status page.
That two-step design is why a good post-purchase page loads instantly: the offer was fetched before the buyer even clicked Pay now. In Post Purchase Upsell Abakira, the check loads the whole funnel (up to three levels of offers) in one request and stores it, so moving from one offer to the next needs no new request to our server.
Which parts of the post-purchase page does Shopify control?
Shopify controls the frame of the post-purchase page: the header with the store name, the confirmation number, the line “You’ve paid for your order.” and the “View order confirmation” link, plus the footer with your policies. Shopify also renders every element in between, because the extension can only use Shopify’s own components.
Shopify’s developer documentation keeps the component list short. As of November 2026 it holds 28 components, among them CalloutBanner, Banner, Layout, BlockStack, InlineStack, View, Image, Heading, Text, TextBlock, Button, Select, Separator, Tiles and BuyerConsent. There’s no HTML element, no style sheet, no custom font and no iframe. An app can arrange these blocks and feed them content. It can’t draw anything else.
What that means in practice, from the code of our extension:
- Three tones (green, amber, red) color any passage. Text can also be bold or subdued. Our offer editor says it in so many words: “Those are the only three colours this page can paint.”
- A badge becomes a rounded pill by uploading it as an image, shown at 96 px wide.
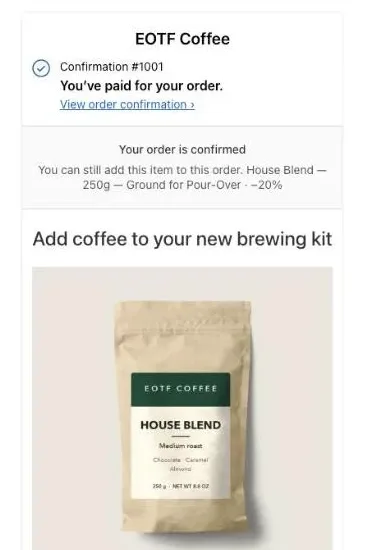
- Width is set by layout sections, not by pixels. The page is two columns on a computer (image left, offer right) and one stacked column on a phone. A full-width image can only be sized by its aspect ratio.
- A second banner section collapses to zero width on one screen size, which is how the phone banner works: one version shows on computers, the other on phones.
What do the Shopify App Store rules require on the page?
The Shopify App Store requirements for post-purchase pages are section 5.8 of Shopify’s App Store requirements, ten rules numbered 5.8.1 to 5.8.10. They require visible accept and decline buttons, the real product title, price and image, at most three offers in a row, a callout banner at the top, a live price breakdown, and no ads or order tracking.
Here they are, as of November 3, 2026, with what each one means on your page.
| Rule | What Shopify asks | What you see on the page |
|---|---|---|
| 5.8.1 | The app holds the post-purchase scope | Nothing visible: it's why only some apps appear in your checkout settings |
| 5.8.2 | Transparent upsell, with accept and decline buttons merchants can't change | A decline link on every offer; button text fixed and translated |
| 5.8.3 | Same product information as the store | The product keeps its store title, price and image |
| 5.8.4 | Limit consecutive requests | Three offers at most in a row |
| 5.8.5 | Correct category for selling plans | Nothing visible: subscription and pre-order plans carry the right category in Shopify |
| 5.8.6 | Redirect to the order confirmation when done | After the last answer, the buyer lands on the order status page |
| 5.8.7 | Use the callout banner at the top | A banner with an intro line, the product name and the discount |
| 5.8.8 | Update the price breakdown | Subtotal, shipping, taxes and total change with variant or quantity |
| 5.8.9 | No third-party ads or promotions | Only your own products, never someone else's offer |
| 5.8.10 | No order tracking or status on the page | No tracking number, carrier or delivery date |
Shopify’s UX guidelines for the page add a few more things an app has to respect: no exclamation points in callout banners, no wording that makes the offer sound compulsory or makes the buyer doubt their order went through, and no images that scroll by themselves.
Our app turns those rules into guardrails in the admin rather than surprises in review. An exclamation mark typed into any buyer text is refused with “Shopify does not allow exclamation marks on this page. Remove the “!”.” A progress step that reads like shipping triggers a warning: “This label reads like shipping or tracking. Shopify may reject the app over it.”
What can a merchant change on the post-purchase page?
A merchant can change the offer itself (product, discount, quantity tiers, the order of offers after a yes or a no), the images, and nearly every word on the page. What a merchant can’t change is the button text, the header and footer, the presence of the callout banner, and the product’s own title and price.
How much of that you get depends on the app, since the extension is the app’s code. In Post Purchase Upsell Abakira, the store-wide parts live on one screen called Buyer page, and each offer’s own words live in the funnel editor.
The banner and the brand strip
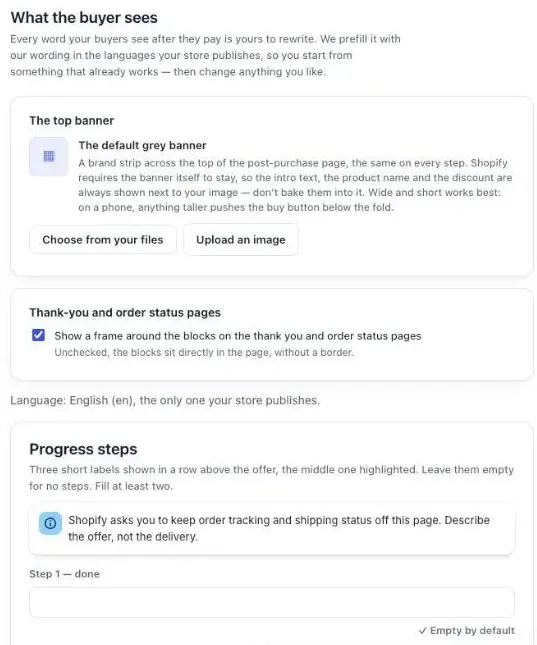
The callout banner has to stay (rule 5.8.7). What you can do is put your brand right under it. On the Buyer page screen, the section The top banner takes an image from your store files or an upload. The banner and its brand strip stay the same on every step of the funnel.
The admin help text says it straight: the intro text, the product name and the discount always show next to your image, so “don’t bake them into it”. Wide and short works best. A second section, The banner on phones, takes a taller version for narrow screens: because a wide strip gets small on a phone, the app takes a taller version for narrow screens. Leave it empty and the wide one is used everywhere. When a banner image is set, our extension switches the callout banner to a transparent background with no border, so your image carries the look and the required banner stays readable above it.
Progress steps
Progress steps are three short labels in a row above the offer, so the page reads like a planned step rather than an ad. In our app they’re empty by default in every language. Fill at least two and they appear: the last label is shown as what comes next and the one before it as where the buyer is now. Finished steps are green with a check mark, the step in progress is bold and slightly larger, and the next one is greyed. Each label holds 24 characters at most, which keeps three of them on one line on a phone.
Rule 5.8.10 is about tracking and status, not about the word “order”. A step like “Order confirmed” is fine; Shopify itself writes “You’ve paid for your order.” in the header. A step like “Shipped tomorrow” is the kind of label the warning above catches.
The texts every offer shares
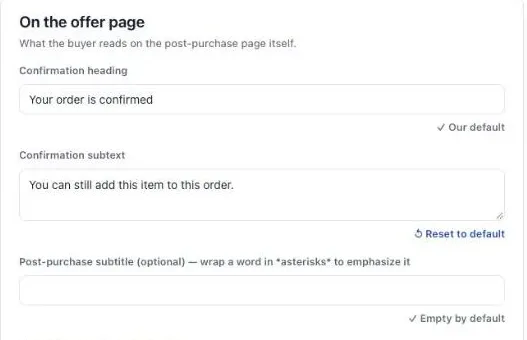
Under On the offer page, you rewrite what the buyer reads on every offer: the Confirmation heading (“Your order is confirmed” by default), the Confirmation subtext, an optional Post-purchase subtitle, the Offer description for percentage and fixed discounts, and the Charge note (“Charged to the card you already used: {amount}”). Two more sections cover the label that stays on the order next to the discount, and the messages shown if something goes wrong, such as a declined card.
Our defaults are prefilled in the languages your store publishes, and the extension shows buyers the version for their checkout language, chosen from 33 buyer languages. The two button labels, “Add to my order” and “No thanks”, can’t be changed because Shopify doesn’t allow it, so the app translates them for you.
Each offer’s own words and visual
Inside a funnel, Edit offer opens Your words on this page: a Promise line at the top, a Selling headline, Your argument (a few lines, where a line starting with a dash becomes a bullet) and up to three Badges. Four placeholders fill in real figures: {product}, {price}, {amount} and {save}. If a figure is unknown for this order, the whole line is hidden instead of showing a sentence with a hole in it.
The selling headline is added above the product name, never instead of it, because rule 5.8.3 wants the product to keep the title it has in your store. You can also replace the product photo with your own visual under Your visual, picked from your store files or uploaded (JPG, PNG, WebP or GIF, 3 MB at most). There’s no field for an outside image link: the image has to live in your Shopify files.
How do I see the page before a buyer does?
You see the post-purchase page before any buyer by using the app’s preview, then confirming with one real card order. A preview is only useful if it runs the same code as the live page. In Post Purchase Upsell Abakira, the Preview panel in the funnel editor runs the extension’s real page code in your admin, on mobile or desktop.
The preview follows the funnel as a buyer would: accept or decline, and it moves to the next offer on that branch, then ends with “The buyer now reaches the order status page.” It never charges anything or writes to an order. It says what it can’t know: “Close to the real page, not identical: Shopify calculates the final prices, taxes and shipping.”
For the final check, place a real order. We did it on October 23, 2026 on our demo store: test order #1010 started as a $49.00 pour-over kit, the page appeared after payment, one tap added a House Blend bag at $14.40 instead of $18.00, and the order closed at $63.40 as one order with one shipment. Our article on testing the Shopify post-purchase page setting walks through that test step by step.
Which orders trigger the post-purchase extension?
The post-purchase extension runs on orders paid by credit card on the Online Store channel, for $0.50 or more, in the store’s main currency, shipped rather than locally delivered. On those orders Shopify loads the extension, asks the app for an offer, and shows the page the moment the payment goes through.
Wallet and installment payments, such as Apple Pay or PayPal, go straight to the thank-you page; our article on why Apple Pay and PayPal orders never see the offer shows how to reach those buyers there.
Two more points on eligible orders:
-
Three accepted offers per checkout. A buyer can accept at most three post-purchase offers on one order. Our extension counts them and, at the limit, tells the buyer: “You’ve reached the maximum number of add-ons for this order.”
-
Shop Pay card buyers see the page too. When a buyer pays with Shop Pay, Shopify doesn’t let the page read the offer data saved during checkout. An extension that relies only on that saved data shows a blank page or nothing to Shop Pay buyers. Ours detects the empty storage and reloads the funnel itself, so Shop Pay card buyers see their offer.
To find out what share of your own orders will reach the page, the guide chapter on who will see your offers shows where to read your payment mix.
What happens when two apps have a post-purchase extension?
When two installed apps both have a post-purchase extension, Shopify runs exactly one. Its own documentation says only one app can be selected for post-purchase offers, and the merchant chooses it in Settings → Checkout, under Post-purchase page. The other app’s extension stays installed and silent, with its offers untouched.
Subscription apps such as Recharge use the same page. On our demo store, the section lists None, Recharge Subscriptions and Post Purchase Upsell Abakira, and only one of them can be ticked.
Three things follow from it:
- Installing a second app changes nothing on its own. The page keeps running the app that’s selected until someone picks another one and saves.
- Picking the new app silences the old one on the next order. The page runs the newly selected app from then on.
- The thank-you page works differently. Thank-you and order status offers aren’t post-purchase extensions. They’re app blocks placed in the checkout editor, and blocks from several apps can sit there together.
If you’re moving from one upsell app to another, our article on switching post-purchase upsell apps gives the order to do it in. If you can’t find the section at all, see where the Shopify post-purchase page setting lives.
What happens to the order while the extension runs?
While the buyer is on the post-purchase page, the order already exists and is paid. Shopify holds its fulfillment until the buyer reaches the order status page, or for one hour after checkout if they never get there. That hold is what lets an accepted item join the same order and ship in the same box.
When the buyer accepts, the app doesn’t charge the card directly. It asks Shopify to calculate the change, Shopify returns the real price with taxes and shipping, and the app’s server signs the change before Shopify applies it to the order. In our app, the discount is always read again on the server, never taken from the buyer’s browser, and the price shown comes from Shopify’s own calculation rather than from our database.
On the order in your admin, the added item shows as a second line with a discount label. By default ours reads “Post-purchase offer (-20%)” for a 20% offer, and you can rename it under On the order on the Buyer page screen. One more practical point from Shopify’s documentation: analytics pixels only report the first purchase event and its value, so the added amount doesn’t appear in them. Read upsell revenue in the app’s results, not in your ad pixel.
For the full mechanics of the tap, the signed change and the downsell after a no, see how a one click upsell works on Shopify.
How do I turn the extension on for my store?
You turn the extension on by installing an app that has one, opening it once, then selecting it in Shopify admin under Settings → Checkout → Post-purchase page and saving. The page shows up on the next eligible card order, with no theme edit and no code.
- Install a post-purchase app, such as Post Purchase Upsell Abakira, and open it.
- In Shopify admin, go to Settings, then Checkout.
- Under Post-purchase page, select the app and click Save.
- Back in the app, turn on a funnel. In our app the starter funnel is created switched off, and the button is Turn on this funnel.
- Dress the page on the Buyer page screen: banner, progress steps, texts.
- Place one card order to see it live.
The guide chapter on turning the one-click page on covers the app’s own setup checks, and the chapter on dressing the one-click page goes field by field through the banner, the steps and the offer words. Other articles on connecting offers to the tools you already run are grouped under integrations.
Post Purchase Upsell Abakira runs the one-click page, the thank-you page and the order status page from the same funnel. Its free plan shows up to 100 offers a month; targeting, several funnels and the second and third offer levels are on the paid plans listed on the Shopify App Store page.
Customize the Shopify post-purchase page with Post Purchase Upsell Abakira
- Select the app in Shopify In Shopify admin, go to Settings, then Checkout, find the Post-purchase page section, select Post Purchase Upsell Abakira and save.
- Open the Buyer page screen In the app menu, open Buyer page. This is where every store-wide text of the post-purchase page lives.
- Add a banner image Under The top banner, click Choose from your files or Upload an image. Add a taller version under The banner on phones if the wide one gets too small.
- Write progress steps if you want them Under Progress steps, fill at least two of the three labels. Leave them all empty for no steps.
- Rewrite the offer page texts Under On the offer page, edit the Confirmation heading, Confirmation subtext, Offer description and Charge note, then click Save.
- Write each offer's own words Open a funnel, click Edit offer, and fill Promise line, Selling headline, Your argument and Badges under Your words on this page. Check the result in the Preview panel.
Frequently asked questions
Is the Shopify post-purchase extension the same thing as a thank-you page app block?
No. The post-purchase extension draws one page between payment and the thank-you page, and only one app can run it. Thank-you and order status offers are app blocks placed in the checkout editor, and blocks from several apps can sit on those pages together.
Can I use my theme's fonts and colors on the post-purchase page?
No. Shopify draws the page itself from its own components, so theme code, CSS and custom fonts don't reach it. Your brand gets in through images, such as a banner strip or a custom offer visual, and through your own words.
Can a developer add custom HTML or scripts to the post-purchase page?
No. A post-purchase extension sends Shopify a tree of ready-made components, and Shopify renders them. There is no HTML, no script tag and no iframe. Tracking scripts that need to see the final order belong on the thank-you page.
Do I need Shopify Plus to use a post-purchase extension?
Not for an app from the Shopify App Store. Shopify's developer documentation limits one case to Plus: custom apps built for a single store that use a post-purchase extension can only be installed by Plus merchants.
What happens to the order while the buyer is on the post-purchase page?
Shopify holds fulfillment of the order. The hold is released when the buyer reaches the order status page, or one hour after checkout if they never finish the flow, so an accepted item can still join the same shipment.
Related articles
Written by Abakira. We make small software: Shopify apps, web tools and iPhone apps. This article is about Post Purchase Upsell Abakira.