Part 1. Get live and earn your first upsell
1 What this app does, and where your offers appear
Three places you can sell to a buyer who has already decided to buy. What each one is worth, and which to set up first.
The hardest sale in your store is the first one. Once a buyer has entered a card and clicked pay, the hard part is behind you. This app sells into that moment.
There are three places it can do that, and they are not interchangeable.
The one-click page, right after payment
The buyer pays. Before the thank-you page loads, Shopify shows a page that belongs to your app. Your offer sits there with one button. No card to re-enter, no second checkout, no shipping form. One tap and the item joins the order that was just paid.
This is the strongest of the three, because the friction is close to zero. It is also the one Shopify controls most tightly, and it does not appear for every buyer. Chapter 2 is entirely about that, and you should read it before you judge your results.
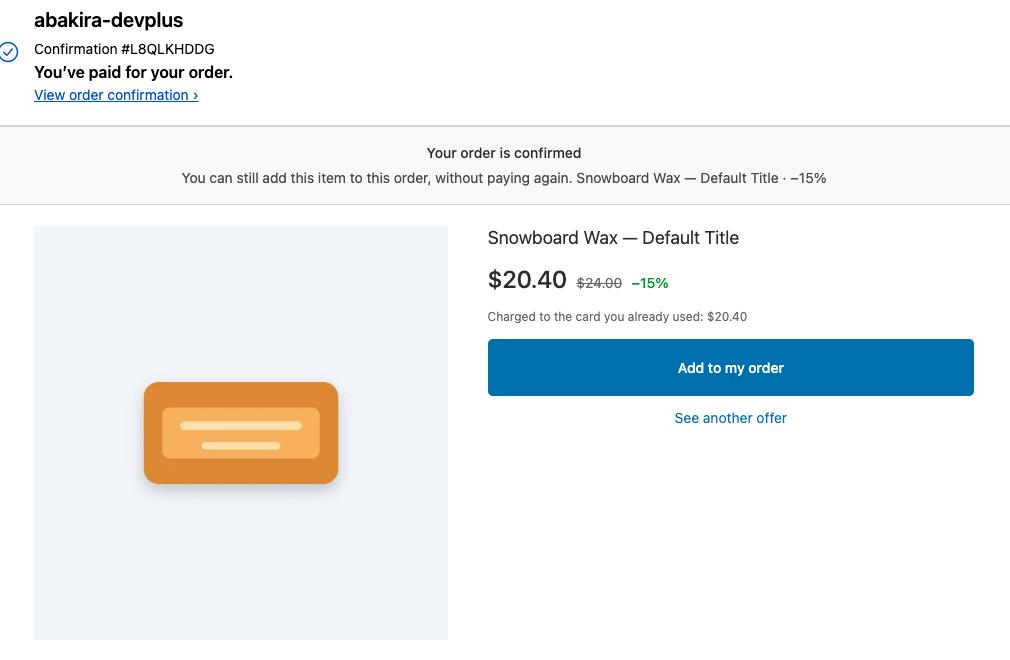
The thank-you page
After that comes the order confirmation page, the one every buyer lands on. Your offer can live there too, as a card under the order summary.
It converts less well than the one-click page, because the buyer has to go through a payment step again. It has one decisive advantage: every buyer sees it. Wallet payments, PayPal, gift cards, bank redirects, all of them. For a lot of stores this is where most of the money actually is, and chapter 7 explains why.
The app can also add the item to the order the buyer already placed, rather than opening a second order. Same order, same parcel, one shipping label.
- The order confirmation visible above the card, so the context is unmistakable
- The card with product, price and button
/guide/shots/01-thank-you-buyer.png
Inside the checkout itself
The third surface sits in the checkout, while the buyer is still filling it in: a short list of products to add, and an opt-in delivery protection line.
This one needs Shopify Plus. Checkout extensions do not render on other Shopify plans. That is not our restriction and we cannot lift it, which is why it sits in a separate plan instead of being sold to stores that would never see it. If you are not on Plus, skip chapter 13 and lose nothing.
Which one to set up first
Set up the one-click page first, even if chapter 2 tells you it will not reach all of your buyers. It is the fastest to configure and the easiest to judge, because a buyer either taps the button or does not.
Add the thank-you page second. It catches everyone the first surface missed, and on some stores it earns more than the one-click page does.
Leave the checkout for later, and only if you are on Plus.
What you should have now
An idea of which surface you are aiming at. Nothing is configured yet, which is fine. The next chapter is the one that decides whether your numbers will make sense later.
Last updated